 Howdy! It's one week before Chinese New Year to celebrate the year of the Tiger! It's been a while since I put up a crafting related tutorial so today I'll be making one on how to make some Chinese Lantern Like Decorations. This is going to be a picture heavy post so ya'll have been warn =P.
 What you need are glue (any type of glue is good. Elmer's, glue gun and also tape is fine too) Also some red embroidery string, a needle to help thread some of the details (optional) and at least two dozen Red Envelopes. Red envelopes are small red decorated envelopes that people would give to one another during Chinese New Year. Inside was usually money and it's been believed that the more we give to others it will come back tenfold throughout the year.
You can get them from Asian markets, stores but if you happen to not be near one... you can use rectangular paper about 3 inches x 5 inches (this can vary as the bigger the paper the bigger the decoration size would be) you can use any color/pattern paper but to capture the Chinese New Year feeling it must be mostly red with or without gold or other details.
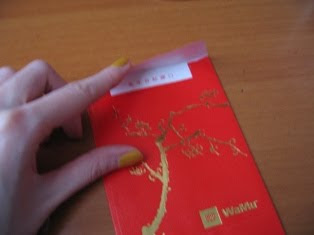
 Now when you open it, it should have a T pattern on it. Now at the halfway marks where my fingers are over in the photo above fold that into a triangle.
Now when you have all twelve folded take 3 of them and match the folds to one another. Glue the flaps together.

When you glue them together it should make sort of a pointed dome like above. Note that there are three of them attached at the flaps and are along the length.
 Now continue gluing the flaps of the envelopes together. Since I started length wise my next layer is along the width.
 Once the ball is almost complete STOP and cut and knot a length of red string use to hang the decoration.
 You can glue or tape it to the inside and make sure it's stuck on tight and the length of the loop is good to hang with.
To add some paper firecrackers to the bottom of the decoration ball, take some of the envelopes and roll them up like above. It doesn't have to be super neat.

Once you have about 7 or more ( you can make as many as you like) cut a long piece of red string and start tying the paper rolls in the middle,

Now you attach the paper firecrackers to the opposite side of the hanging part of the ball and let dry.

Once it's dried you can hang these little balls anywhere. The firecracker part would naturally twist a bit giving it a twirl. The best part is that you can use the same pattern with different color, texture, pattern paper to suite your mood to make ball decorations for parties and what not. It's easy to do with kids and that you can make HUGE ones by using more envelopes as the top base. Since I used 3 envelopes as my top base it's a bit smaller then a soccer ball. IF you were to use more the ball will get bigger. Also if you don't like the little flaps coming out you can fold and glue them to the inside so the outside would make a smooth diamondish ball configuration.
Until next time... have fun and look stop on by for more posts about Chinese New Year =)


7 comments:
This is wonderful and so pretty. What a great teacher you are. Looks like a fun project. Thank you for sharing.
xooxRosebud.
I love Chinese New Year! My work is right near China Town in Sydney, and my fave colour is red! xoxo
Great step by step too darling!
Oh that is so cool. Thanks for sharing.
this is such a great tutorial !
CNY is making everyone go loco here, I guess it is the equivalent to Christmas so I understand now :D
Great tutorial! I'll keep it in mind for whenever I need to organize & decorate for a party or other occasion!
Hope you're having a great weekend!
thanks for posting this -- its really neat. imma check out ur blog more often. ps i really like ur nail polish color.
nice red lantern ball...
i used to do that for CNY but no time..
so buy instead =p
Happy CNY
Post a Comment