LiPeony Shop

Monday, June 28, 2010

Making a Vest

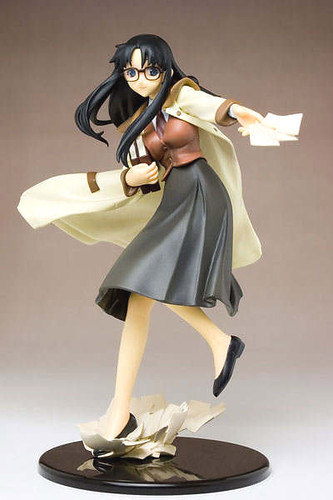
I've been writing on and off about my attendance to one of the biggest anime conventions Otakon this July 31 - August 2. I've planned to do two cosplays over the three days. So far I am done with Lei Fang (post of how that came along). The next one is Yomiko Readman from Read or Die (ROD) which is the above character. I love her because she's this introvert quirky bibliophile secret agent with the power of paper. My awesome friend introduced the OVA to me and suggested I cosplay her since I look similar to her down to the glasses >_> .

That was last year and this year I'm determined to finish this costume. Her outfit seems very everyday plain the fact that I'm so petite it makes it very hard to find clothes that doesn't look like a kid's. This is where I got to bust out the sewing machine and what not. I found an awesome and rather easy instructions for a Vest Tutorial on Threadbanger and it even comes with a Youtube video.
I used a T-shirt that fitted nicely on me and penciled a pattern using that on newspaper leaving about an inch for seam allowances. There was one back piece and one left/right piece which are exactly the same. I was happy to find the perfect shade of tan brown at an awesome fabric store P&S Fabrics on Broadway. They recently moved across the street but if you're in the area in NYC... they have a lot of fabric, buttons, yarn, thread, ribbons etc etc. One thing I love about the store is that they have knitted/crocheted swatches of the yarn they sell so you can feel and see if you like the results.
This is my family's sewing machine. It's one of the industrial version that either my mom or grandma got from a factory that was closing down. This baby is at least 20 years old and it still keeps on trucking! My mom and grandma takes very good care of it and knows the ins and outs. I'm still a novice but my mom was surprised on how quick I was picking this stuff up to the point in which she said I can easily surpass her skills. That I highly doubt because she makes all the samples that everyone else in the garment factory follows and the go-to girl for any questions. I realize I need a new pin cushion for the top so I think I'll browse around Etsy for a cute one.
After about two hours of sewing and mom teaching me how to sew buttonholes the vest comes to life. I love how it came out though it was a bit tighter then I wanted. Must do larger seam allowances. I washed it and waiting to iron it at my boyfriend's place. My mom was extremely proud =D
Here I am in my impromptu cosplay. My mom took the photo so it was kind of not good ... hehe... The shirt and dress are from my closet and the red tie was something a dear friend brought for me a while ago. The vest look pretty good. This week I'll be working on the coat which is a whole other headache...

I do hear and read a lot about family who don't support watching anime/cosplaying and the like. I'm very glad my family is not the same way. They're more amused and shrug it off as "kids will be kids" or it's a "generation thing". One great thing that came out is my mom and I bonding over making my costumes. She loves that I'm learning from her and though it's for costumes she's thrilled nonetheless.

Until next time... let loose the creativity ...

Friday, June 25, 2010

Otakon Cosplay Development =D

It's about a little more then a month till Otakon which is a huge anime convention. Besides meeting some of the creators, voices, writers, music and fan based panels and workshops they have... one of the biggest things is Cosplaying. That generally is making/buying costume and role playing as a character from an anime, game or w/e. I've been debating on who to cosplay as I'm still a beginner.. This year I'm planning to do two >_< (call me crazy!) . One is the girl above from the game series "Dead or Alive" named Lei Fang... though believe me I can't pull off that kind of pose in such a high slitted dress.
My sister is great at those kind of button mashing fighting game. The main reason why I wanted to cosplay her is that my bf had brought me several beautiful Qipaos and one was the one below:
The dress is similar to the one she wears except mine has flowers except of a phoenix and its less revealing and a tad shorter. Another reason is waiting on the long long long lines to get registration done. Unfortunately it can take hours standing outside in hot July/August weather. This costume would be good for that... just need to get some good sunscreen...
Also I remember these old shoes from my H.S prom that would be great for this and they're fairly comfortable. I can always add in some Dr. Scholls or something for extra comfort =D. The only thing I was missing are those tiny wrist cuffs. I had white cloth and miraculously a very similar shiny satiny purple cloth that matched the purple edging of the dress. I measured my wrist and cut two rough squares of white for two cuffs and a large purple square to make the borders. I used some pins to see about how big the width of the cuffs to be about 2 inches but always leave extra room for seam allowances. I then cut the big purple square into four strips. My first try the cuff was too wide so I trimmed it down. I used velcro to fasten them together so it'll be easier to take off and put on.

I think they came out rather nice though I think I'll iron them to get a crisper edge to the purple. I had originally planned to put a pocket somewhere so I can store money or something small so I don't need to carry a bag. I suppose a small bag won't be too bad =D
Not too tight... not too loose. I'm working on my second costume tomorrow... this one will be harder even though the clothes are more generic. Due to my petite size it's hard to find the articles of clothing I need. I have a vest pattern all cut out and stopped by the fabric store and got the right color fabric. This would be my first time making a vest and my mom is here to help if I have some questions =D

Until next time... all bushed from making stuffz!

Wednesday, June 16, 2010

A Little Weird Drawing

Lately I've had a bit artist block so I've been drawing random things and the lil above dude came up. I'm a very big sci-fi/fantasy/anime fan and it mixes cuteness with scifi and the ever popular cupcake. Anyways enjoy the funny lil art =D

Until next time... step out of the norm and into the weird!

Monday, June 14, 2010

Weekend Wrap-Up

This weekend was a busy one! I was vending at the Hester Street Fair and it was very fun! I shared the space with two other NewNew Teammates... Corey from Sansmap that makes these awesome bags and Angela that has her own WEBSITE in the making and Etsy shop EnchantraGirl also in progress =D. She mixes and makes all these beautiful jewelry that has a fresh simple taste to it. I've already ordered a ring XD. Can't wait to see it!

Today was slow and probably because the weather had that "threatening it might rain" outlook but the day was actually very beautiful and warm. I was also the day with the World Cup game between England and the U.S.A if I'm not mistaken.
Despite that there was a fair amount to traffic coming in and there was 50/50 amount of vendors and food vendors. The food is awesome... I tried out the chocolate baguettes from the bread stand across from me and it was so so so good! Angela raved about the omelet station and the summer rolls. There was also the interesting spice vendors that had just bowls and bowls of different spices above. They also made blends of spices on request and I thought that was pretty darn nifty. Thankfully the wind was minor and the spices weren't sent to our tent as I'm very sensitive to strong smells.
Here are the new cards I made with the new stamps and stamp pads. If you want to know more about the process and reviews on the new ink I brought you can refer to this POST. My sister was surprised they were stamped on because they look printed to her. The ink dries so smoothly on the paper. I was surprised at what sold which was this octopus tea card I made a while ago.
These are my prints. I've yet to find a nice 5 x 7 photo holder that can hold my photos both vertically and horizontally so I left them in small piles. One thing I do love is the 5 x 7 three photo frame where I put my animal trio in. That was how I had meant for the trio to be displayed. It would look awesome in a nursery or child's room. I might be making some new animal prints like that very soon. I've also been asked to make custom orders of the simpler designs like the animals with people's names on it. I haven't thought of that but that's a great gift for people.

Sunday my friends and I had a crafting party of sorts where we made different pocket invitations for the wedding. We followed these simple instructions on Wedding Bee. I don't have any pictures which I regret but it was fairly easy. If you do like pocket invites you can adjust these to fit your style. Once thing is I do love the Martha Stewart Score Board which is awesome for scoring =D.

Until next time how was ya weekend?

Thursday, June 10, 2010

Sewing a Bag

I'm very proud today because I made the above little purse out of my bf's torn shirt. The shirt was torn beyond repair and I love the feel of the 100% cotton fabric and the nautical stripe pattern of it. So I was looking though different patterns and one of my favorite blogs full of fun things to DIY is How About Orange. Her website is clean and chock full of awesome ideas! I came on this Buttercup Bag Pattern from Made By Rae. My sewing skills aren't very advance and I'm lucky that my mom has a sewing machine at home and taught me the basics. My seams aren't super good I really like how it came out. The instructions were clear and I loved the various diagrams and pictures. It even has a little pocket on the inside. Note that I didn't use a metal clasp but instead got Velcro which was the only thing I had. I added the little bow from ribbon to add a girly detail to it =DAs you can see it's roomy enough to fit my huge wallet, green first aid kit, my phone and a pack of tissue. I had enough room to put small other things like maybe lipstick, chapstick, a pocket mirror etc. This is the best thing I've made from an old shirt and if you have some old shirts this is a great way to recycle/upcycle it!

Until next time... reuse, recycle and upcycle!

Tuesday, June 8, 2010

Busy Busy Tuesday

I hope everyone has a great weekend! I spent mine with my bf where he grilled for the first time this summer and boy is he happy with his new grill. I stopped by Micheal's, A.C. Moore and JoAnne's and got the stamping ink and cleanser. After a lot of research and deliberation I've decided to get the Memento Dew Drops. They come in many vibrant colors and the small size and shapes makes it easy to get the ink on every detail. The colors dry rather quickly and I can draw without the color running off. The felt dewdrops come in sets of four in coordinating colors. They're about $10 but I used a 40% that knocked the price down to about $6 bucks and at $1.50 which is a dime

I also got the StazOn jet black because I use black the most and I've heard very good things about it. The color is very true black and the smell is pleasing for some reason, like candy. This also dries pretty darn fast. I also got the StazOn Cleanser and it works great! I really like how it cleans all the ink dried onto the crevices of the stamp. Though I have heard these are bad on acrylic stamps because it erodes them.

Here are some blank cards I made for the Hester Street Fair this Saturday June 12th
Here's some camera, cupcakes and bunny love.

Here's the penguin collection.

Here's some hearts and cupcakes. I really love the colors. They're very vibrant and the two cupcakes reminds me of cotton candy. Next time I'm going to buy the rest of the colors! I'm not sure whether to have them up in my store in packets or to even put them up in my store... any suggestions?

Until next time... how was ya weekend?

Thursday, June 3, 2010

New Ideas To Try!


It's hard to believe that June is already here! I have a craft show June 12th at the Hester Street Fair. I've been experimenting with an idea of making some stamped notebooks and cards. I've been falling a bit behind on drawing so I've slowed down in putting new art to my LiPeony Art Print shop. Anyhos I made the above little stamps... a camera, penguin and fish. They're three things my significant other loves. He plays around with his DSLR camera and he has this thing for cute penguins and fish. I've been playing around with designs and patterns and I like the ones above. I'm not sure whether to put them on blank cards or notebooks. I found these very nice small 4 x 6 notebooks that are made of recycled paper. I might want to add a button clasp to the side to close the book. The reason is that when I drop my own books in my bags sometimes they get caught with other books or stuff in my bag and it bends or ruins the pages. I'll be researching and buying some stamping ink. I want some very vivid colors. So far it seems Stazon, Ancient Page and ColorBox are pretty good. Once I get decisions on these done I'll be hosting a giveaway of these patterned notebooks. So look out for that next week!

Also with Otakon coming up I've also been working on some art to put up for the art auction. So far I am finished with one. I need two more. This year getting an artist alley table was pretty expensive this year. So I opted not to get one. Though I did want to get one but last year I didn't go see the other exhibits and what not. So this year won't be the same! =D

Until next time... stay cool =D

Tuesday, June 1, 2010

Cool Popsicle Fun

Ice Cube Popsicle Fun @ LiPeony
It's getting pretty hot and June is already here. Time sure flies by! I hope everyone had a great Memorial Day weekend! I went to my cousin's graduation and boy it was cloudy then it rained then 10 minutes of rain it got all hot and sunny. Anyways I remember when we were all young our dear grandma would make some toothpick Popsicle in the ice cube trays. They were perfect to pop into our mouths, cool out drinks and you can freeze any juice or soda. Sprite and Coke ice cube pops were pretty darn good!

Here's a super simple recipe that I'm sure many have used to make tiny ice cube Popsicle!

Popsicle Ice Cube Pops
Ice cube trays (for extra fun you can get inexpensive different shaped ice cube trays like hearts/stars etc.)
Juice (any juice/soda)
toothpicks (optional)
small fruit pieces (berries, cubes or balls of melon, apples, oranges etc)

Pour juice into the ice cube trays to about a centimeter or so below the rim. This allows space for the ice to expand without overflowing. Put it in the freezer for about an hour or so and take it out. The juice should be sort of ice/slush now you can put the toothpicks in the center and place it back in the freezer for a few more hours and ta-da ice pops!

For something a bit fancier you can pour the juice halfway into the cube and freeze for an hour then put small fruit pieces like berries and what not and pour more juice over it but leaving space for the ice to expand without overflowing. You can put in funky/decorated toothpicks to add some pizazz to them. These are great for parties and a fun way to decorate your drinks while staying cool.

I'll be hoping for nice weather on June 12th when I'll be vending at the Hester Street Fair.

Until next time... how are you staying cool?