BLAH!!!
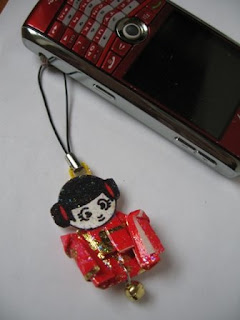 So today is a very cloudy day but it's the only time I can take pictures. I use a Canon PowerShot SD500 which is at least a year or two old but very good and reliable. My cousin got it for cheap at a sale. Unfortunately I don't have a light box and well I'm too lazy to really make one. I use a long white box I got from the Gap and a white piece of paper. The everyday shove into your printer paper is used as my base. I move the box so the white inside catches as much light as it can from the window and the white reflects the light making it sort of like a poor man's light box that works great during those sunny days. But... during those cloudy days my pictures come out like above. Meh... not so pretty?
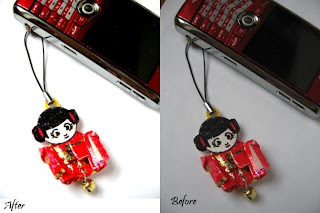 SHAZAM! A little photo editing and look it's light light light! I don't use photoshop or any high tech whatever program. In fact if you have Microsoft Office/Suite 2003 and above, you should have the same program I use which is called Microsoft Office Picture Manager. It's extremely easy to use. I'm not a really good picture taker and it shows but though trial and error I use this program to really boost up my photos. I'll show you how I do it. If any of the pictures look too small just open it in another tab or window and it will enlarge it.
 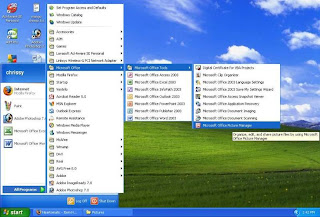 First of all find the program. It's usually in Microsoft Office Tools Box. I'm not sure what the others do as I'm not that much of a comptuer whiz. The only thing I use are Word, Powerpoint and Excel. You can press File -> Open and choose the file you want to fix up. Another way is to Right Mouse Click the photo and choose to use Microsoft Picture Manager to open. It should bring you to the next screen.
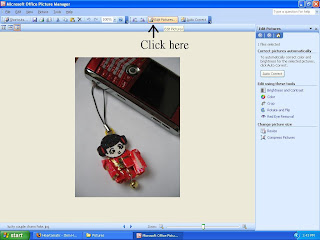 Click on the Edit Pictures. This will bring up a host of tools on the right hand side. The first one says Auto Correct. Basically it will automacally correct the photo and usually means making them brighter and fix up the colors. Most of the time it is not enough as it still looks very grainy depending on you and your camera. This program does not correct fuzzy pictures so make sure you at least have a clear crispy photo.
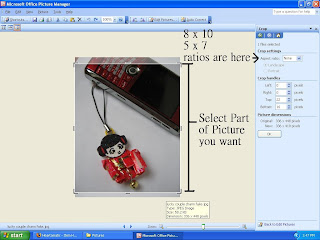 First of all I usually crop the picture so I can get the area of the picture I want. For example in the one above I included some of the brown of my desk that I want to crop out. Use your mouse to adjust the area you want and whatever is fuzzed out will be cropped out. Another note is that you can also do fixed ratio area of the photo like 5 x 7 or 8 x 10. It is more so for printing as most printers print 8 x 10 and 5 x 7 ratios. This will make it so that your picture will not be cropped when being printed.
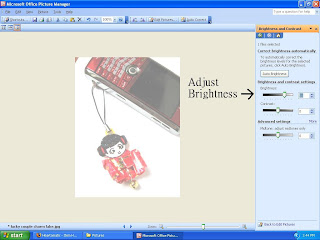 Next I work on the brightness. Click the Edit Pictures tab on the top and choose Brightness and Contrast. You can either move the bar right or left to make it brighter or darker or put in a number. I brighten it until the background is white or close to white as it can be.
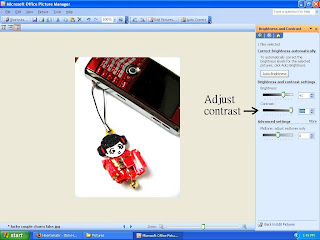 Next I adjust the contrast. Note that the contrast number is usually higher then the brightness number. It'll make the dark parts darker while retaining the brightness. From here I eyeball it and adjust both brightness and contrast so that the picture looks as true to the real item in light as possible. I don't mess with the midtones because it adjusts both the brightness and contrast and I rather do it individually.
 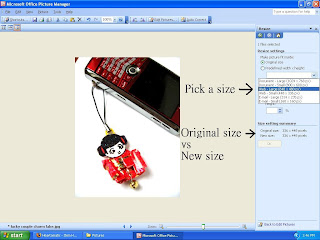 Once you have the balance just right. You can also resize it. Generally when you take a picture with the digital camera it saves it in a rather large size. Mine are usually between 3,000 - 2,000 pixels. For Etsy and the web you generally don't need it so big. For Etsy I use Web - Large even though it is smaller then the 1000 x 1000 pixels but for me the pictures look fine. Plus it makes the file smaller making it faster to upload and also saves space on your computer. This helps if you ahve thousands of pictures like I do. A few tips is if you want the image to be right in that square when Etsy cuts off photos, you can either shape your images into squares or make it into a rectangle and make sure the item is at the center.
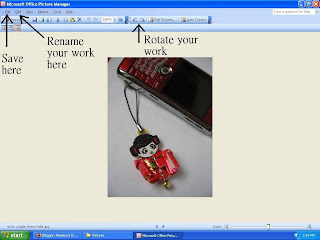 Now that it's all fine and dandy you can save it, rename it or rotate your work if you want some interesting views. Another neat trick is what if you take a great picture but gosh it's crooked! Well you can choose the Edit Pictures -> Rotate and Flip here you can rotate it 1 degree at a time or 90 degree at a time till it looks straight. Crop it so it looks like a square/rectangle photo and no one would be the wiser. This helps a lot when you scan pictures as I notice no matter how much I keep then straight they tend to be just a tad crooked.
I hope this helps you out somehow. I'm neither an expert nor are my pictures super OMG but they're nice, clear and crisp which is fine with me.
Until next time... Happy picture taking! =D


6 comments:
This is a great tutorial for those without the high end stuff. Bravo!
Sometimes I wish Photoshop were as simple to use for minor touchups like this. I'd love to use Picture Manager when I edit my pics but I'm usually on my work computer when I edit them, which is a Mac.
Great tutorial...I do use picture editer on my windows as well...very useful when I'm too lazy to load photoshop. (Takes up a lot of memory) And yes friday was a dreary day wasn't it...ruined my picture taking time...oh well...
Great tutorial - I use a free software called the gimp (gimp.org) ... it's similar to photoshop, but FREE!
Great job. I do use that program sometimes or else I upload my pics into Picasa and do some editing there. Also free! Thanks for the tips.
It looks good! Mr Morrgan is some kind of Photoshop master so it's been easiest for me to use that and run to him at signs of trouble. ;)
I made a light box once, it was ugly and fell apart (I'm no good with paper and cardboard...). But, I found that using the daylight fluorescent tube (6500K, if that says anything to you) from my terrarium, together with a white sheet of paper, works very well as a light source on those cloudy days. Only a little brightening up is needed.
Post a Comment